You can send custom visitor information to LiveSupporti and that information can be displayed during the chat. In order to do that you have to use WebHooks. Let see what WebHooks are and how they work.
How WebHooks work
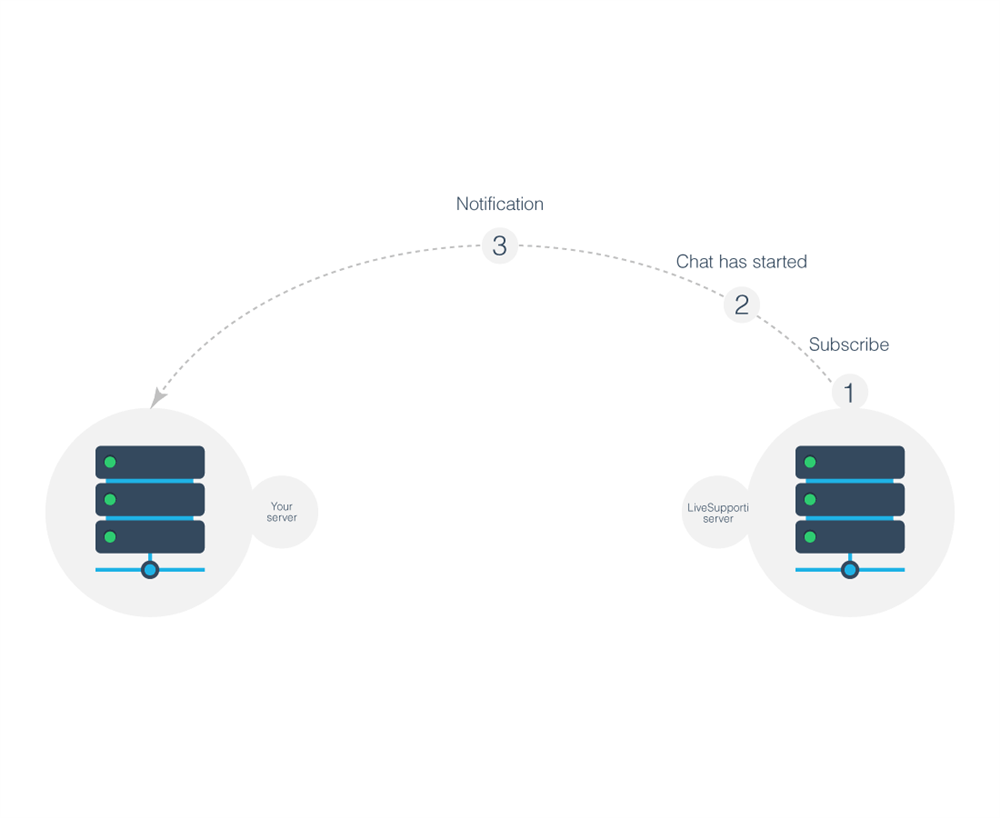
WebHooks are HTTP callbacks. You and/or your app can sign up for notifications when something happens in LiveSupporti and your URI endpoint will get an HTTP POST request when that thing happens.
This is illustrated below:

The WebHook flow goes like this:
1. You and/or your app subscribe to an event by providing your callback URI (this is the process of creating a WebHook).
2. When this event happens in LiveSupporti, we send notification in the form of HTTP POST request to your callback URI. The POST request contains information about the event.
Display custom visitor information during the chat
When you send additional visitor information to LiveSupporti after a chat has started, that information will be displayed during the chat.
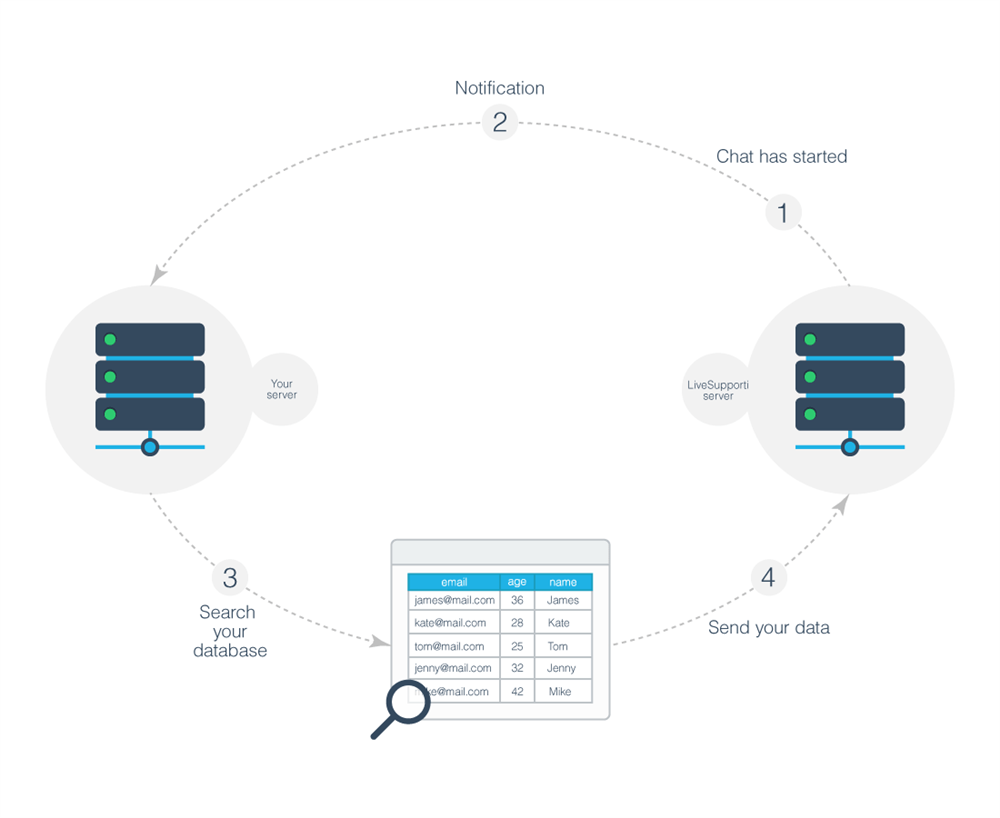
First you have to subscribe to receive notifications when a chat has started and these notifications will contain visitor's email (you subscribe by creating a WebHook, see below). Then you can make a search in your database by this visitor's email and get the information which you have in your database by that email. After that you can send this visitor's information to LiveSupporti which will be displayed during the chat.
This is illustrated below:

For example, when you send visitor's Age and Name to LiveSupporti this information will be displayed during the chat.

Create a WebHook
You can subscribe to receive notifications when a chat has started by following the steps below:
1. Sign in and click on WebHooks on the left menu.
2. Click Add a WebHook.
3. Select Chat started and Visitor data.
4. Enter your callback URI. Please note that you have to return the "echo" query string parameter in the response with Content-Type:text/plain in order to be able to subscribe successfully. Your server should allow Cross-Origin Resource Sharing (CORS) for domain livesupporti.com. In that way your server can receive incoming requests from livesupporti.com.
5. Enter your Secret which have to be between 32 and 64 characters.
6. Click Create.
When you perform the steps above LiveSupporti will send a request to the provided URI and if you return the "echo" parameter the WebHook will be successfully created. In that way we verify the URI you have provided.
How to use a WebHook
Now you have created your WebHook and you will receive notifications in the form of HTTP post requests to the URI you have provided during the creation of the WebHook.
LiveSupporti sends the notifications to your URI as HTTP post requests with Content-Type:application/json; charset=utf-8
Please note that during the creation of the WebHook, your URI have to return "echo" query string parameter in the response with Content-Type:text/plain and you should enable CORS for domain livesupporti.com.
Chat started WebHook
LiveSupporti can send you notification when a chat has started. This notification is represented as JSON object with the following properties:
| Name |
Type |
Description |
| Id |
string |
Unique ID which is used to identify the firing of the WebHook |
| Attempt |
number |
The number of times this WebHook has been attempted to be delivered |
| Properties |
object |
Additional case-insensitive properties that can be sent with the WebHook |
| Notifications |
array |
Notifications that caused the WebHook to be fired |
You need to get the first element from the Notifications array and get the Data object which is represented as JSON with following properties.
| Name |
Type |
Description |
| AccountId |
string |
The account's id |
| AgentId |
string |
The agent's id |
| Visitor |
object |
The visitor |
The Visitor JSON object is represented with the following properties
| Name |
Type |
Description |
| Id |
string |
The visitor's Id |
| Email |
string |
The visitor's email |
The following properties should be send back to LiveSupporti along with your custom visitor data: AccountId, AgentId, Id (you have to send this later as VisitorId).
You can now search your database by this visitor's email, get additional data about that visitor and send it to LiveSupporti.
Send custom visitor data
You can send your visitor data to LiveSupporti by making a post request over HTTPS to https://livesupporti.com/api/visitors/{visitor_id}/details using HTTP Basic authentication. More about HTTP Basic authentication you can find here.
Your request should have Content-Type:application/json; charset=utf-8 and should contain a JSON object represented with the following properties:
| Name |
Type |
Description |
| AccountId |
string |
AccountId which you have received with the notification |
| AgentId |
string |
AgentId which you have received with the notification |
| VisitorId |
string |
VisitorId which you have received with the notification |
| Fields |
array |
An array with objects containing name and value properties |
In the array Fields you have to put the data you want to send to LiveSupporti. For example, [{"name":"Name", "value":"Jason"}, {"name":"Age", "value":"25"}]
Your request will receive response code 200 if everything is ok, otherwise response 400.
Example request
|
{
"AccountId":"b943010f-b565-4731-9f34-42c54319957f",
"AgentId":"150",
"VisitorId":"169.26.97.99-1231178",
"Fields":[
{"name":"Name", "value":"Jason"},
{"name":"Age", "value":"25"}
]
}
|
The fields "Name" with value "Jason" and "Age" with value "25" will be displayed during the chat.